
Automation is a great thing but sometimes your devices are not ip-ready to manage them from distance. Car park management systems, service or industry that have no ability to manage Ethernet ports or interfaces and the need to operate remotely can now be accessed from lan or internet.
I will show you a simple (and cheap!) way to manage them using a simple Arduino board with ethernet port and one pc/server.
Arduino works at low voltage and is not dangerous but any equipment to be connected via relays can operate at 220-400 volts. These connections should only be performed by trained personnel and maximum safety. Turn off the power before making connections. Risk of serious injury or death!
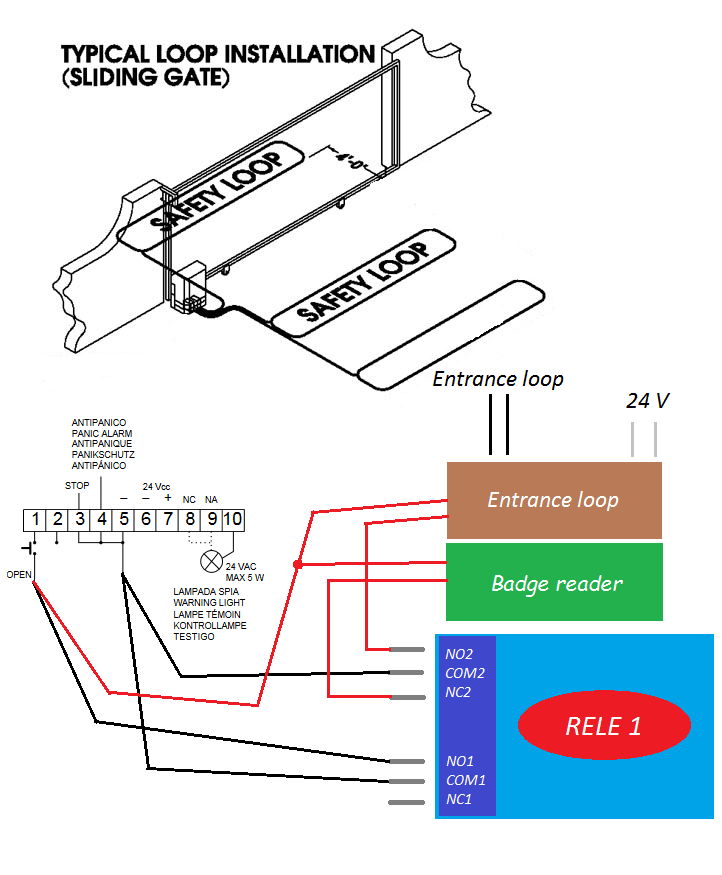
Example of installation
This example is a normal gate with a loop for the opening, a pair of photocells for security management and a magnetic key card reader as shown in the picture. You will have the ability to manage the opening automatically with the loop as automatic mode and manual mode with keycard.
I do not dwell on normal connections for the ordinary operation of the door; I’ll tell you instead how to make the change to make the operation manageable remotely.
What we need is :
-
Arduino board (in this example we use an Arduino Uno board)
-
Ethernet shield for Arduino Uno
-
PSU with USB connector type-B (alternatively PSU with jack connector 5V)
-
Relè board Arduino-compatible
-
Pc with Arduino software (to load sketch onto your Arduino Uno)
-
USB cable type-A to type-B (to connect pc to Arduino)
- Pc with XAMPP web server connected to your lan (https://www.apachefriends.org/it/index.html ) or web server hosted on internet ( you will need public IP to manage the system from internet)
What you can do :
-
Open/close barriers, gates, door operators
-
Exchange between automatic and manual mode
-
Add badge readers to your system
-
Turn on/off the lights
-
So much more …
Description of the remote control system
We build up a system to manage remotely 2 or more relè to actuate your equipment. We need a web server connected to Arduino so the operator can use html page with buttons to operate on the system.
Let’s start!
Plug your Ethernet shield into Arduino (pay attention to not bend the pins)
Now we have to connect the relè board .. you may use jumpers or weld the cables to the appropriate pins (find them on ebay or any other shop online)

Use scheme for the appropriate connections.
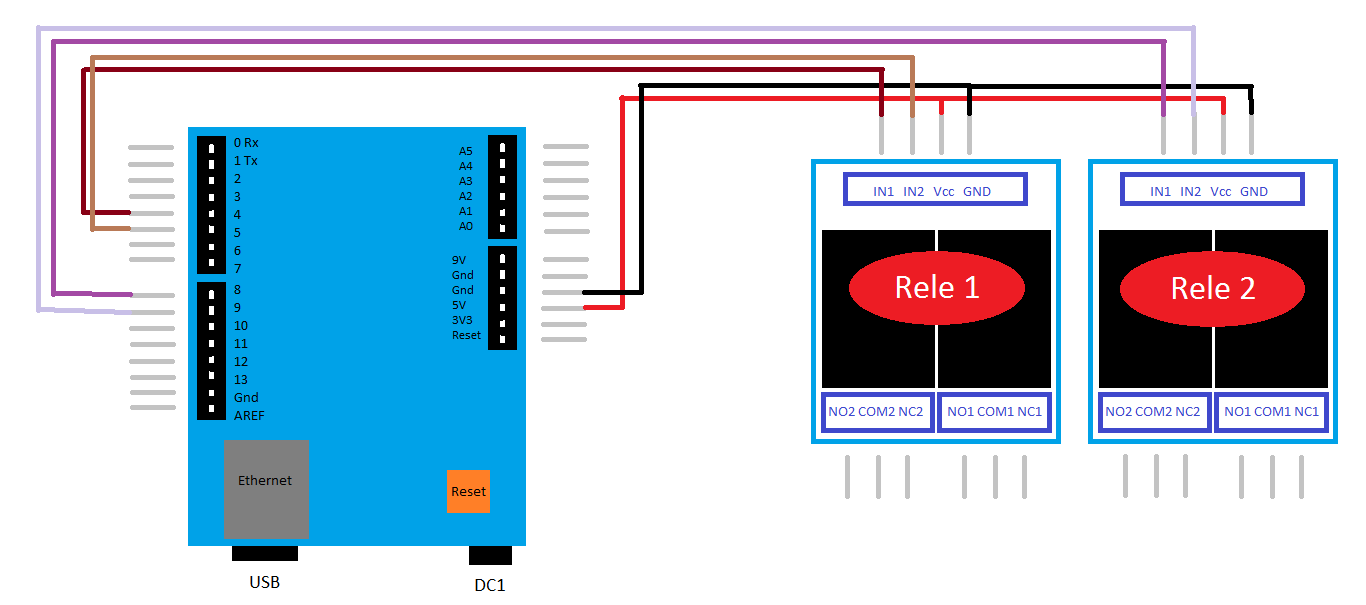
This example uses 2 relè (NC-NO) connected to Arduino. Of course you may use more relè if you need them.

-
Relè board 1
-
COM1 NO1 : open entry gate
-
COM2 NO2 : loop reader
-
COM2 NC2 : badge reader
-
VCC : +5v taken from Arduino board
-
GND : 0v taken from Arduino board
-
IN1 : +5v trigger terminal relè 1
-
IN2 : +5v trigger terminal relè 2
-
-
Rele board 2
-
COM1 NO1 : open exit gate
-
COM2 NO2 : loop reader
-
COM2 NC2 : badge reader
-
VCC : +5v taken from Arduino board
-
GND : 0v taken from Arduino board
-
IN1 : +5v trigger terminal relè 1
-
IN2 : +5v trigger terminal relè 2
-
Of course you may use the relè for any other contact you want to manage (just modify the sketch at your needs).
Once you have finished connecting the various cables it is time to load the Arduino sketch. Connect Arduino to your pc using a USB cable, run Arduino program (downloadable from https://www.arduino.cc/en/Main/Software), open the sketch you’ve downloaded from Bits from Italy and, following the comments included in the program (I have put comments on any part of the sketch so you may adjust it to your needs), change the required parameters like web server ip address and eventually any other text you want to be included on your web page.
It is important that you change “yourserverip” with the correct ip of your XAMPP server.
When you are done editing the sketch to your liking upload it to Arduino Uno.

Now you need to install XAMPP on a pc (for the installation instructions visit https://www.apachefriends.org/community.html). Once installation is completed you have to copy index.html, body.html and “images” directory into the \htdocs directory of your XAMPP server (for example C:\xampp\htdocs). The existing index.html should be renamed – for example index.html.old .
Reboot server and check out if your page is working … open browser on your server and go to http://localhost/index.html … you should see the page where you can control your Arduino.
Take a look at the top menu. There is Home and then Area1 and Area2 … these links take you to the webpage on any of the Arduino you have on your lan. Area1 points to 192.168.1.10 and clicking on it you should see the page with the buttons to operate on relè (gate icon opens the gate and open/closed door operates as automatic/manual).
You are done!
You can add more Arduino on your lan (or internet – in this case you need an internet connection and you should set up a VPN to reach it) just modify index.html to add more “Area” to menu.
I hope this helps you and makes you have fun.
See you at the next project!
Apache XAMPP – free web server with PHP support and free MariaDB database
Arduino – Arduino is an open-source electronics platform based on easy-to-use hardware and software.
[Download non trovato]
Have I been helpful? you can make a donation
Disclaimer
Bits from Italy not be held in any way responsible for any damage to people, things or animals determined by the use of software content and / or downloaded from this site or published articles. It does not provide any implicit or explicit guarantee of operation of the projects submitted as they can vary on facilities or equipment software and / or hardware supplied to the user of our site. Bits from Italy disclaims any responsibility for the possibility of any technical or practical inaccuracies and / or typographical errors for which it is intended, as a result of an alert, immediate correction. You use this website with the understanding that you are responsible for your own results.